Step 1: Register and become a member of the New Babbage community. You’re now one of us! Buy a hammer and get to work. What could possibly go wrong?
Step 2: Read our Posting Guidelines.
Step 3: There are three ways to post content on the New Babbage website: Blogs | Forums | Events. Choose one and go read that section. Or read the whole thing. It’s okay, we’ll wait.
Step 4: Create your content.
Step 5: Bask in the adulation of your peers.
Stuck? Post a message in the BAR Support forum!
How to create a blog post
The New Babbage website is built on WordPress technology, and working with posts is done in the WordPress editor. We realize not everyone is familiar or comfortable with the WordPress interface, but it is much more powerful than editors we can currently embed in the website, and will give members more flexibility. We’ll try to make it as easy as possible but in the spirit of science, we encourage you to experiment. Try not to set anything on fire.
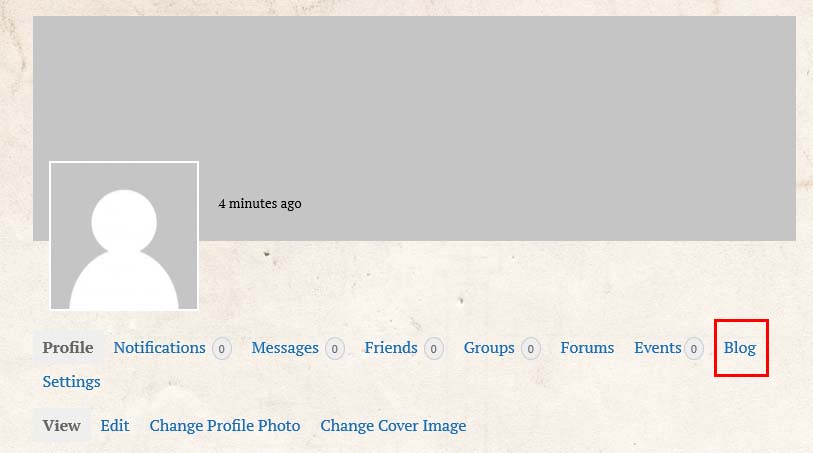
Step 1: Go to your profile page. If you are logged in you can get to your profile by clicking on your name at the top of the right sidebar. (We assume you know who you are, but feel free to click everywhere. You’ll get there eventually. We believe in you!)
Step 2: Beneath your profile pic, click on the “Blog” link.

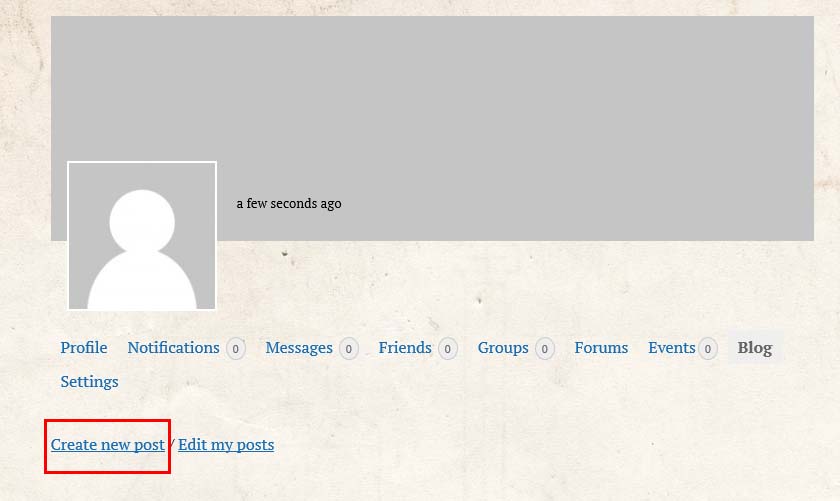
Step 3: Click on the link that says “Create new post.”

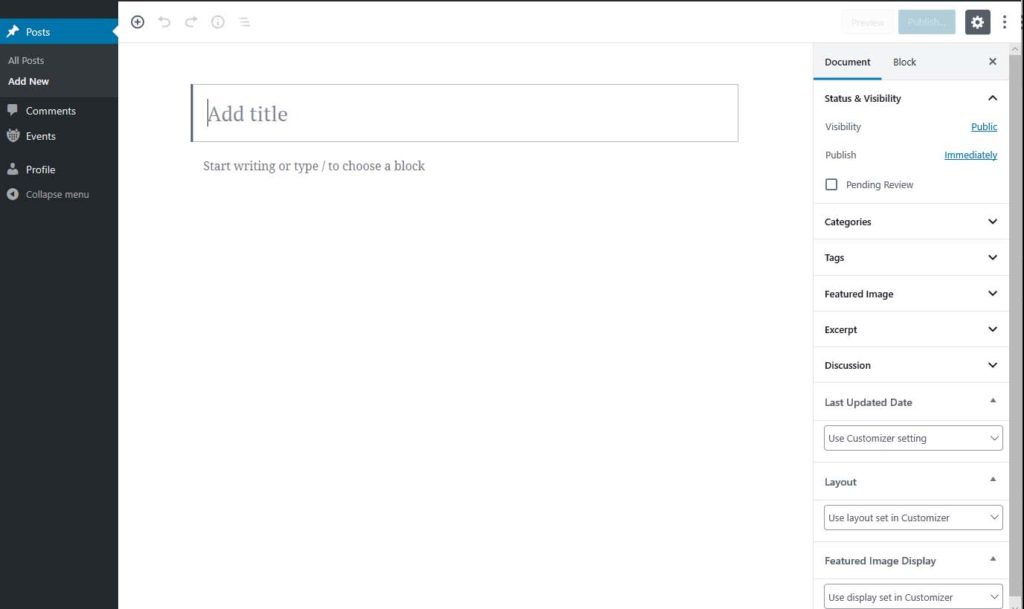
Step 4: You are now in the great and powerful WordPress editor.

Step 5: Create your post
Using the WordPress editor
In the left sidebar, you will see the following menu items:
- Post
- Comments
- Events
- Profile
Right now you are on the “New Post” page, so that’s what we’re going to cover here. Creating a post is really tricky: you simply start typing. Add a title, and then add some content.
Blocks
The biggest thing to know about the WordPress editor is that it is now built around the concept of “blocks.” Every section you put in your post is a block, and it can be managed and formatted independently. For the most part you won’t need to worry about it, but for things like images, it helps to know what blocks are.
Every time you hit the Enter key to start a new paragraph, you automatically create a new “paragraph block.” You can add different kinds of blocks in two ways: first, by hovering over your paragraph to see the block outline, and then moving your pointer over the bottom border to see a “+” appear; second, by clicking the “+” in the top left corner of the editor. There are image blocks, list blocks, heading blocks, separator blocks, and more.
Images
If you want to get fancy and add an image to your post, we have some good news and some bad news.
Bad news first: Members can no longer upload images to the website; the massive store of images we had on the old website caused a catastrophic failure. We don’t want to get to the point again where images push us past our website hosting limit, so we’ve decided to ask members to just embed images instead.
The good news: Embedding images is super easy.
Create a new block in your document, usually by hitting Enter to create a new line. Paste the link to your image, and it will automatically embed!
Links
To add a regular old link into your text, just write what you want to be linked, select it, and then hit the link icon that appears over the block. Paste in your link, hit Enter, and voila! You have created a link.
Formatting
If you want to make some of your text bold or italics, you can find what you need in the block icons that appear when you hover over your text.
For other kinds of special formatting blocks, look in the upper left corner of the editor for the “+” icon. There are tons of blocks you can add, including separator lines.
Categories and Tags
When you are done with the text of your post, go over to the right sidebar and click “Document” at the top. Here you will see some posting options, including categories to choose from, a tag field, a custom excerpt, and whether to allow comments. Please choose only one or two categories for your post, and use tags however you’d like to label your content.
For the remaining fields please leave them set on the default value from the Customizer. Changing these could affect the way your post is your displayed.
Step 6: Publish
When you’re all done with your post, hit the Publish button at the top, and then confirm by clicking it when it appears again.
Congratulations!
You just made a blog post. It will now show up in the Recent Blog Posts section of the front page, as well as on the Blog page in your profile.
How to create a forum topic
The New Babbage website uses a plugin called bbPress to make community forum posting possible. You don’t really need to know this, but now you know it anyway.
Step 1: On the home page, click Forums on the menu at the top, then select the forum you’d like to post to.
Step 2: On the forum page, there is a button at the top called “Create New Topic.” Click it!
Step 3: Create your topic in the editor that magically appears.
Step 4: Add tags if you’d like. Make them good. We like good tags.
Step 5: Submitting images can be a bit tricky. Images from some sites, such as Flickr, Instagram, and others, will not automatically embed in the forum editor. To add an image from one of these sites, you will need to follow their instructions to get an embed code. Once you have that code, click the HTML tab in the forum editor, and paste it in. When you go back to the View tab, you will see your image.
Note: WE KNOW THIS IS A PAIN! We’re looking for a better forum solution.
Congratulations!
You just made a forum post. It will now show up in the Recent Forum Posts section of the front page, as well as on the Forum page in your profile. It will also show up on the Forums pages themselves, for obvious reasons.
How to create an event
Having a party? Scheduling a zombie apocalypse? This is where you do it if you want other New Babbagers to put it in their calendars.
Step 1: On the home page, hover over the Events on the menu at the top, then click Create a New Event.
Step 2: You are now in the WordPress editor! Add a title, event date and time, and a description.
Step 3: To add an image, paste the link to the image into the editor and it will automatically embed!
Step 4: Add event details in the right sidebar. If you don’t see the event details field, click the Document tab at the top of the right sidebar.
Step 5: When you’re happy with your event, click the Publish button in the top right of the page. Click Publish again to confirm when the button appears.
Congratulations!
You just posted an event, and it will now appear on the main Events page, as well as in the Upcoming Events list in the right sidebar of the site. Sit back and wait for Babbagers to appear at your soirée.
Note: Want to publicize your event even more? Post about it to the New Babbage Facebook group, to the Discord server, and to the Steampunks of New Babbage Second Life group. We are currently investigating ways to easily share events to other social media outlets.

